We found all the materials to build this shed at our local home center. Most of the construction is straightforward and requires only standard carpentry tools and a circular saw. To build the windows and door, you'll also need a table saw, power miter saw and router. We used a Kreg pocket hole jig and pocket hole screws to assemble the door and windows. With a helper or two, you could have the platform and shell built in two or three days. Then expect to spend four or five more days completing the siding, trim, doors, windows and roofing.
A few weeks before you start, check with your local building department to see whether a permit is required and to find out how close to the lot lines you can build. Then call 811 for instructions on how to locate buried utility lines. The first step is to set a pair of treated 6x6s on gravel beds as a foundation for the shed platform.
When you've decided on a shed location, dig two trenches 16 in. wide, 12 in. deep and 13 ft. long. Center the trenches 66 in. apart. Fill the trenches with a 3-in. layer of gravel and compact it with a hand tamper. Repeat this process until the trench is full. Use a level and long board to level the top layer of gravel. If the ground is flat, also make sure the gravel beds in the two trenches are level with each other.
Cut the treated 6x6s to 12 ft. and set them on the gravel so they're parallel and the outside edges are 6 ft. apart. On sloped ground, you'll have to raise the 6x6 on the low side until it's level with the adjacent 6x6. Do this by stacking treated 2x6s, 4x6s or 6x6s on top of the treated 6x6 to reach the right height. Use a 4-ft. or longer level to make sure the 6x6s are level and level with each other. Finally, square the 6x6s by adjusting the position of one 6x6. Slide the 6x6 back and forth, not sideways, until the diagonal measurements from opposite corners are equal. Build the platform with treated 2x6s, 24 in. on center, and cover it with treated 3/4-in. plywood (Figure B).
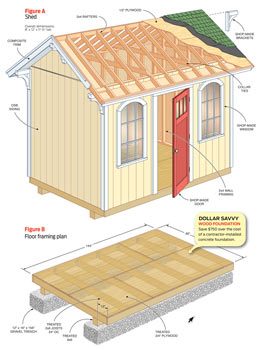
Figures A: Shed and B: Floor Framing Plan
Note: Figures A and B (along with Figures C through G) can be downloaded and printed from Additional Information below.
Sign up here with your email
ConversionConversion EmoticonEmoticon